Thursday, June 7, 2012

New Gallery Photo:

Another photo by Kelly Ealy. I played around with the colors a little on this one and cleaned up the hair, in addition to the usual skin smoothing/channel play.


Original shot:


New Gallery Image:

The photo is by Kelly Ealy. I mostly played around with channels and smoothed out the skin.


Here is the before shot:

Monday, June 4, 2012

Skin Tutorial Update: High Pass Filter

Here’s a quick update on my previous skin tutorial that uses the high pass filter to provide smooth yet detailed skin.
The picture we will be working on is from Editable Photos:


Feel free to click on any of the pictures to get a closer look.

1.  First, hit all of the major blemishes with the spot healing brush/patch tool as described in my previous tutorial. The surface blur filter is great, but it’s not magic.


2.  Next, use the magic wand tool to select the skin. Edit the selection in quick mask if you need to, and be sure to adjust the tolerance if necessary. A higher tolerance means that the magic wand selects a larger area, and the opposite for a smaller tolerance. I usually use a tolerance of about 10-30. Do this until just about all of the skin is selected (it’s ok if you leave a little around the edges, but you should get everything in the middle)


3. Copy and paste the selected skin into a new layer. Duplicate that layer. Make the top layer invisible, and set the bottom layer to 60% opacity


4. Go to Filter > Blur > Surface Blur and play around with the settings until you get the skin to be very smooth (for more details, check out my last tutorial). You want the skin to be smoother than you want your final image skin to be. We will add the detail back in a few steps.


5. Go over the eyes, eyebrows, nostrils, and lips with the eraser tool (set to the brush setting). Again, for more details, look to my original skin tutorial


6. Now, turn the top layer back on. Set the blending mode to “soft light”, and go to Filter>Other>High Pass. Play around with the settings until you get the desired amount of texture back into the skin. You can even change the blending mode to “overlay” or “hard light” to get a more pronounced effect. You can also duplicate the layer or play around with the opacity to get a harder or softer effect, respectively.  


Here is the final image. See how the skin is nice and smooth, yet retains a decent amount of detail? An added plus of the high pass filter is that it can also sharpen the eyes and lips (as long as you erase the surface blur layer from those areas)


 For more advanced retouchers, check out this MM post about going beyond high pass to enhance skin texture without sacrificing image quality

Thursday, May 24, 2012

First Gallery Photo:

This photo is from the photographer Lesya Gulkina


Here is the before pic:


Wednesday, May 16, 2012

How to Retouch Lips

This tutorial will show you how to retouch lovely, luscious lips.

I'll be focusing on the lips, manipulating effects and layers to recolor, and add gloss and liner to the lips.

The image I will be working on is from Editable Photos


Lip Recolor:

Blue lips are a little odd, no? I think a mauve shade would fit this image a bit better. 

1. Lets create a new layer, and fill in the lips with a pink color.


2. Play around with the opacity levels and blending modes.

I set my my layer to the Color mode, although the Overlay mode also produced interesting results. I also erased any pink that was on the teeth


This created the following image. I like the pink lips better than I did the blue ones, but this still isn't the color I'm looking for.


3. Create a new layer with a darker color than the first. I created a purple layer, and set the blending mode to Hard Light


4. Go into the effects>blending mode, and uncheck the box that says G. This will make all of the highlights on the lips a gold tint, instead of a white tint.


When you add a Gaussian blur, you get the following:


It's a nice golden-peachy shade, but still not quite what I'm looking for.

5. Create a new layer, and fill the lips in with the same darker color. Set the layer to the Color Burn blending mode at 50% opacity, and move it under the initial pink color layer. You can make the color lighter or darker by adjusting the opacity of the Color Burn layer.


After a little bit of cleanup, you get a nice, mauve color with gold highlights. Perfect.


Lip Gloss and Line:

Ok, back to the original image with the blue lips (it makes the effects that I'm showing pop more).


We're going to be using layer effects to add gloss and liner to the lips

1. Color in the lips with your closest approximation of the original color

2. Set the layer to hue (or, any other blending mode that looks good)


3. Go into effects and add the satin effect to the lip color layer


4. Set the color to white and play around with the blending mode, opacity, size/distance. Set the angle to the direction of the light. Generally, the normal, color dodge, or overlay modes are good for adding shine to lips.


5. To line the lips, add the stroke effect. Play around with the colors, opacity, and blending mode until you find one you like


6. To get rid of the blue on the tongue, add a divide layer on top of the lip color layer, and color the tongue area with the original color.

Final result after cleanup:


Saturday, April 7, 2012


How to Retouch Skin

Skin retouching is one of the most vital techniques in a retoucher's portfolio. However, skin retouching can also be one of the most difficult skills to learn. In this tutorial, I will show you how to make skin look both flawless and natural.

I have three techniques that I use to touch up skin. These three techniques are complimentary - your image will look better if you use all three, rather than just one.

The photo I will be working on is from the Editable Photos Collection. Click to see a larger version:


Technique 1: Channel Manipulation

Channels are grayscale images that store color information. They can be accessed in the Channels tab (usually next to the layers tab - else, you can find the Channels window in the "Window" dropdown).

Usually, the most useful channel for skin retouching is the red channel. It works especially well for light and medium-toned skin. Channel manipulation can significantly change the appearance of your image.

1. Go to the channels menu, and select "red".


Use "Select All" (ctr-A or cmd-A), and copy (ctr-C or cmd-C) the red channel.
Now, go to the layers tab, create a new layer, and paste in the greyscale image. You should get something like this:
2. Now comes the fun part:

Go into the blending mode dropdown and go through the options until you find a setting that you like. Feel free to change the opacity and to add multiple layers.

For this particular image, I chose to make two copies of the red channel greyscale image, and set the bottom one to a "divide" layer with a 50% opacity, and the top to a "soft light" layer with a 100% opacity.

Feel free to experiment with different channels. I've found that combining "luminosity" or "divide" with "screen", "overlay", or "soft light" often creates a very nice image. Don't forget to merge your layers after you're done!

Technique 2: Spot fixing

 Spot fixing is a very easy task to learn, and it can produce amazing results. The two tools used for spot fixing are the patch tool and the healing brush.


Observe: Here, I use the spot healing brush tool to fix a small blemish on the model's face.


Use the healing brush/patch tool to fix the largest blemishes on your model's face. There is no need to use it for everything, and the next technique will fix many of the smaller blemishes.

Technique 3: Selective Blur

This is the most dramatic skin smoothing technique, but also one of the most commonly abused. There are many different levels of selective blurring - it all depends on how you want your model's skin to look. I prefer a more natural blur. 

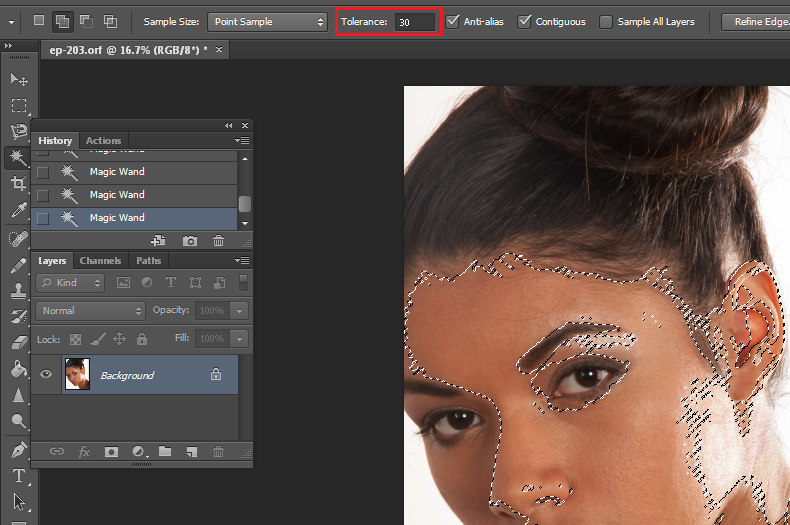
1. Go into quick mask mode

 
 2. Select the Pencil tool and color in your model's skin. Don't worry about being a little messy - the most important thing is that you get all of the skin.

3. Leave quick mask mode by pressing the quick mask button. Your canvas should look a little like this:
 
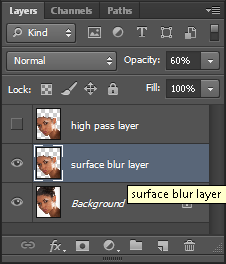
 Invert the selection (Select > Inverse) to get all of the skin. Copy your selection into another layer. Set the opacity of that layer to 60%

 
4. Now it's time for the blur. Go to Filter>Blur>Surface Blur. Play around with the settings until you get a skin texture that you like. Don't worry if the eyes look blurred, we will fix that in the next few steps.

5. Switch your blurred layer into Difference mode. It will be very dark. Use the eraser to erase the eyes, lips, and nostrils (I also like to set the erase to 60% opacity and remove some of the blur around the hairline). Now is also a good time to erase any mistakes you made when you made the quick mask.


 6. Now you have two choices: You can set the blurred layer either to Normal mode or to Lighten mode. Normal mode will give you a blurrier skin texture, whereas Lighten will mainly remove the darker blemishes. I usually prefer Lighten mode.


After a little bit of cleanup with the spot healing and patch tools, here's the final result of all three techniques!