

Here’s a quick update on my previous skin tutorial that uses
the high pass filter to provide smooth yet detailed skin.
The picture we will be working on is from Editable Photos:

Feel free to click on any of the pictures to get a closer
look.
1. First, hit all of
the major blemishes with the spot healing brush/patch tool as described in my
previous tutorial. The surface blur filter is great, but it’s not magic.

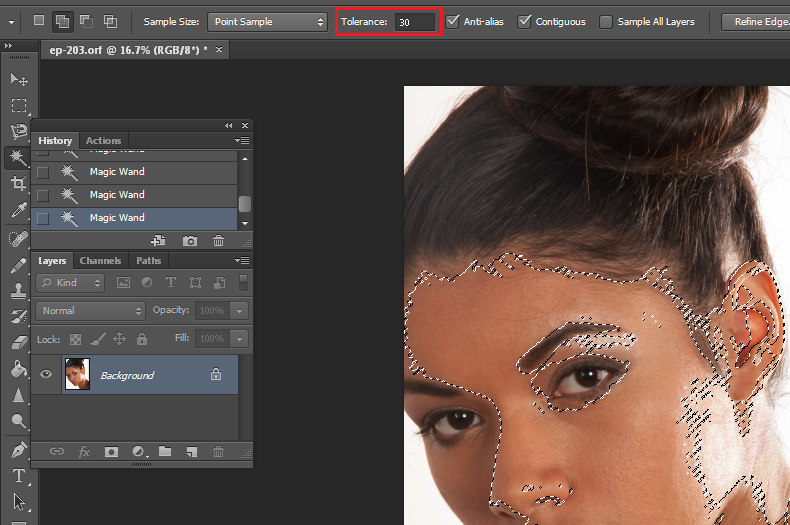
2. Next, use the
magic wand tool to select the skin. Edit the selection in quick mask if you
need to, and be sure to adjust the tolerance if necessary. A higher
tolerance means that the magic wand selects a larger area, and the opposite for
a smaller tolerance. I usually use a tolerance of about 10-30. Do this until
just about all of the skin is selected (it’s ok if you leave a little around
the edges, but you should get everything in the middle)

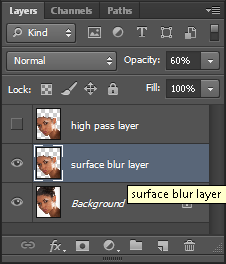
3. Copy and paste the selected skin into a new layer.
Duplicate that layer. Make the top layer invisible, and set the bottom layer to
60% opacity
4. Go to Filter > Blur > Surface Blur and play around
with the settings until you get the skin to be very smooth (for more details,
check out my last tutorial). You want the skin to be smoother than you want
your final image skin to be. We will add the detail back in a few steps.

5. Go over the eyes, eyebrows, nostrils, and lips with the
eraser tool (set to the brush setting). Again, for more details, look to my
original skin tutorial

6. Now, turn the top layer back on. Set the blending mode to
“soft light”, and go to Filter>Other>High Pass. Play around with the
settings until you get the desired amount of texture back into the skin. You
can even change the blending mode to “overlay” or “hard light” to get a more
pronounced effect. You can also duplicate the layer or play around with the
opacity to get a harder or softer effect, respectively.


Here is the final image. See how the skin is nice and
smooth, yet retains a decent amount of detail? An added plus of the high pass
filter is that it can also sharpen the eyes and lips (as long as you erase the
surface blur layer from those areas)

For more advanced retouchers, check out this MM post about going beyond high pass to enhance skin texture without sacrificing image quality

No comments:
Post a Comment